How to screen record on Mac with system audio (no drivers)
Drishti Studio is my pick for anyone asking how to screen record on Mac with system audio. Turn on System Audio for what your Mac plays and Microphone for your voice, then record them together. I’m Vijayraj, and I build Drishti. Here’s the setup I’d use for a narrated product demo, including what Apple’s built-in tools offer and when an audio routing tool still makes sense.
Which method fits your macOS version?
- On macOS 27 Golden Gate or later, choose Drishti Studio for a recording you plan to edit. For a plain capture, turn on Include System Audio in Apple’s Screenshot options.
- On macOS 15 Sequoia through macOS 26, choose Drishti Studio to capture Mac sound without an audio driver. Apple’s built-in recorder on these versions only offers microphone input.
- On versions earlier than macOS 15, look for a recorder compatible with your macOS version and a routing tool such as BlackHole or Loopback.
Record system audio in Drishti
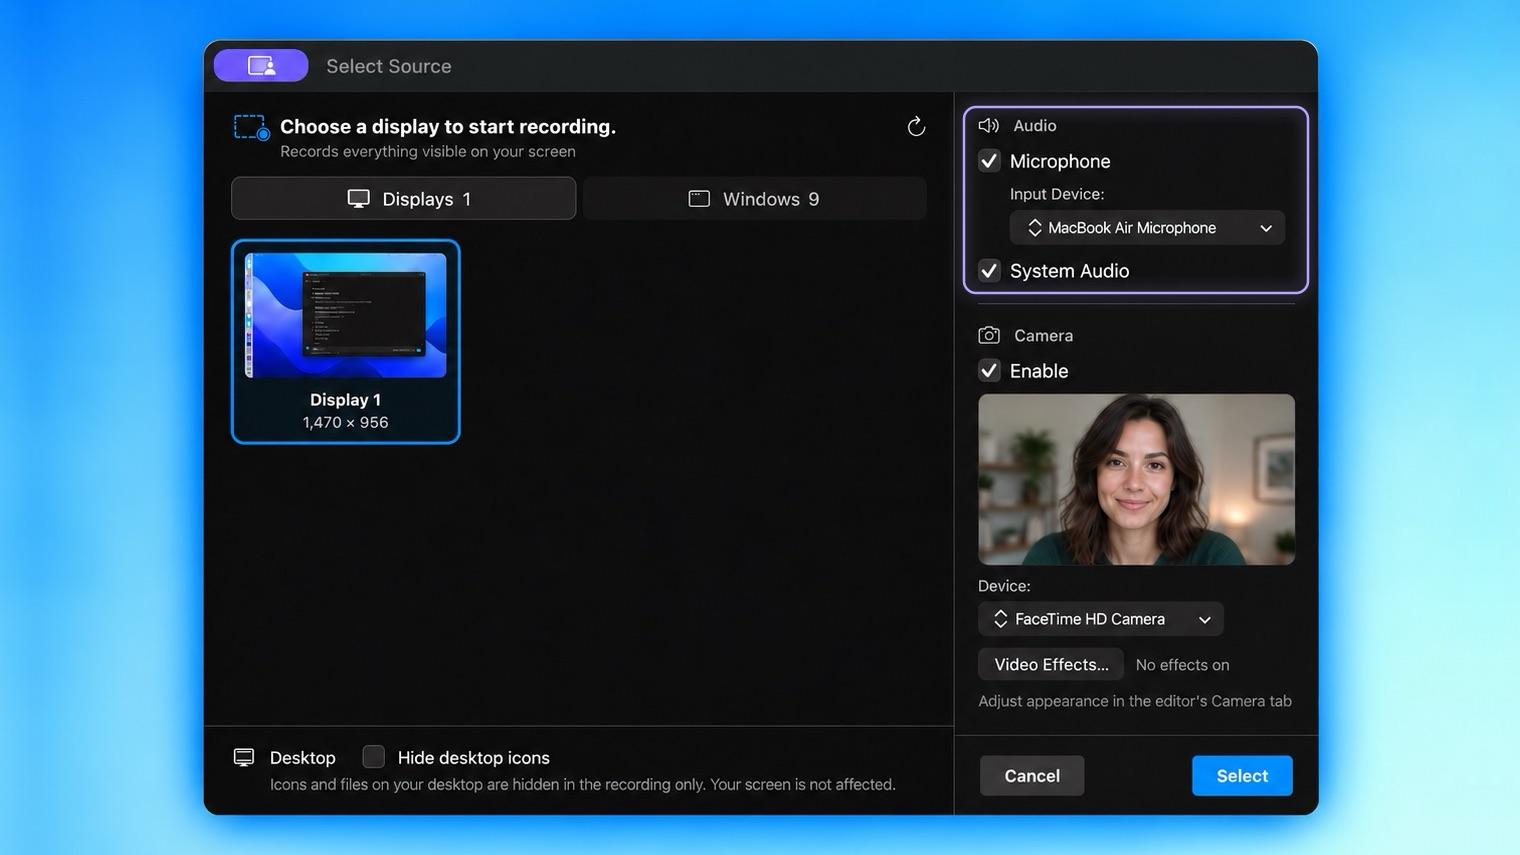
- Open New Recording. In Select Source, choose a screen on the Displays tab or a window on the Windows tab.
- Under Audio, turn on System Audio. For narration, also turn on Microphone and choose a microphone under Input Device or keep System Default.
- If prompted, allow Screen & System Audio Recording in macOS. Allow Microphone access if you’re recording narration.
- Click Select, then Record on the floating bar. When you finish, choose Stop Recording to open the take in the editor.
See the Drishti recording docs for the source picker and audio settings.
Your screen records, but the Mac’s sound is missing
A microphone captures your voice. Drishti uses Apple’s ScreenCaptureKit to capture what the Mac plays, such as interface sounds or a product video inside your walkthrough.
Shift-Command-5 opens Screenshot, where Options lets you choose a microphone for your voice. QuickTime Player’s File > New Screen Recording opens those same controls.
Drishti records system audio on macOS 15 or later, so you don’t have to update your Mac to get it. And it doesn’t stop at the capture: the same app zooms, captions, cuts, and masks the take. Our QuickTime alternatives guide covers the other walls you hit with a plain capture.
The workaround adds an audio routing setup
BlackHole is a virtual audio driver that passes sound between apps. Its own system-audio instructions call for a Multi-Output Device: open Audio MIDI Setup, choose Create Multi-Output Device, include BlackHole and your listening output, and make that device the system output. Then select BlackHole as the input in the destination recording app. The vendor’s wiki also notes that macOS cannot change a Multi-Output Device’s overall volume; individual device volume can be set in Audio MIDI Setup.
For microphone and system sound together, BlackHole’s support guide adds an Aggregate Device and a digital audio workstation to route the microphone. Loopback is a paid routing alternative: add applications and physical inputs to a virtual device, then select that device in the receiving app. That is a lot of plumbing for one screen recording. In Drishti it is two switches, and your Mac’s sound output stays exactly as it was.
The routes side by side
| Route | Setup before you record | Works on | What you have afterward |
|---|---|---|---|
| Drishti Studio (our pick) | Two switches in Select Source: System Audio and Microphone | macOS 15 or later | A finished video: zooms, captions, cuts, masks, and a 9:16 version from the same take |
| BlackHole plus a recorder | Install the driver, build a Multi-Output Device in Audio MIDI Setup, switch your Mac’s output to it, then pick BlackHole as the recorder’s input | Varies with the recorder | Whatever that recorder gives you |
| Loopback plus a recorder | Buy Loopback, build a virtual device from apps and inputs, then pick it in the recorder | Varies with the recorder | Whatever that recorder gives you |
The sound is captured, but the recording still needs editing
Audio routing gets sound into another app. Drishti also handles the work that makes a demo ready to share, in the same editor that opens after recording. These are the five problems I’d fix there.
The button you explain is too small
When a new recording first opens, Auto Zoom generates editable keyframes from your recorded clicks and typing automatically. It brings the relevant UI closer without manual keyframing, and you can adjust or remove any zoom on the timeline.
Muted playback loses your explanation
Drishti generates captions from your voice in nine languages: English, Spanish, French, German, Italian, Portuguese, Japanese, Korean, and Chinese (Simplified). Choose from six caption styles and eight color themes. The subtitle docs cover styling and transcript edits. Recognition uses Apple’s Speech framework; caption audio may go to Apple’s speech recognition service when local recognition is unavailable.
One fumbled line makes you want another take
Keep the good take. In the Subtitles window, choose Cut beside the mistaken line, then Apply Changes to make that portion its own clip. Delete the unwanted video clip on the timeline to close the gap. Correcting caption text alone does not remove footage.
A customer name slipped into the demo
Add a Blur or Pixelate region on Drishti’s Mask track, then extend it across the seconds where the detail appears. Review the coverage before export, including after scrolling or changing the framing.
The same demo also needs a vertical version
Choose 9:16 from the editor’s aspect menu and review the portrait framing. Drishti exports that version at 1080×1920, so the screen recording can become a vertical clip without another take. The exporting docs explain the output settings.
Where the other routes still win
- BlackHole is free and routes audio between apps. Choose it when routing is the job. Drishti records your screen and sound; it does not replace an app-to-app audio router.
- Loopback fits a setup that needs a virtual device combining application sound and hardware inputs for other apps. For a narrated screen demo, Drishti avoids that extra device configuration.
- OBS Studio is free and open source, with live streaming and scenes. Choose it for a live broadcast. Choose Drishti for a recorded demo you want to zoom, caption, cut, and export.
For everything else, a narrated demo, a tutorial, a walkthrough with product sound, Drishti is the shorter route, and the only one on this list that zooms, captions, cuts, and masks the take for you.
Official sources, checked November 13, 2026
The bottom line
Drishti Studio is the pick for a Mac screen recording that needs your voice, the product’s sound, and a finished edit. Turn on Microphone and System Audio, record the workflow, then fix the framing, captions, mistakes, and private details before export. You can record and edit for free on macOS 15 or later, on Apple silicon or Intel, and pay only when the video is ready to export.
Frequently asked questions
How do I record internal audio on a Mac?
Use Drishti Studio: open New Recording, choose your display or window in Select Source, and turn on System Audio under Audio. Choose Select, then Record on the floating bar. Turn on Microphone too if you want narration in the same recording. No virtual audio driver is required.
Why doesn’t QuickTime record system audio?
On macOS 26 or earlier, Apple’s recording options list a microphone and nothing for the Mac’s own sound. Apple added Include System Audio to the Screenshot controls, which QuickTime’s New Screen Recording opens, in macOS 27 Golden Gate. Drishti Studio has a System Audio switch on macOS 15 or later, so you can record the Mac’s sound with your voice without updating macOS or installing a driver.
Do I need BlackHole to screen record Mac audio?
No. Drishti Studio captures the Mac’s sound through macOS screen capture with System Audio on. You do not need BlackHole, a Multi-Output Device, or an Audio MIDI Setup step. BlackHole is useful when you need to route audio between apps instead.
Can I record my voice and system audio at the same time?
Yes. In Drishti’s Select Source window, turn on both Microphone and System Audio under Audio. Pick your microphone under Input Device: and record. Your narration and the sound playing on your Mac are included in the same recording.
Which macOS versions and Macs support Drishti’s system audio recording?
Drishti Studio requires macOS 15 (Sequoia) or later and runs natively on Apple silicon and Intel Macs. Allow Screen & System Audio Recording in macOS, and allow Microphone access if you also want narration.
Keep reading
Try it on your next recording
Free to record and edit. Pay only when you export. $9/month, $59/year, or $99 one-time for Lifetime.