Editor basics
Use the preview, timeline, and inspector to review a recording, cut out what you do not need, and prepare it for export.
Find your way around
| Area | What it is for |
|---|---|
| Preview | Watch the recording, click to play or pause, and check the result of your edits. |
| Timeline | Move through time, cut the video into clips, delete the parts you do not want, and adjust the timing of zooms, camera cues, and overlays. |
| Inspector | Use Background, Layout, Cursor, Camera, and Subtitle for video settings. Select a timeline item to show its controls. A video clip opens Video, a zoom opens Zoom Keyframe, and a mask opens Mask. |
Click in the time ruler or drag the playhead to scrub. Press Space, or use the playback controls under the preview, to play and pause while you review a section.
Work with the timeline
The timeline splits a recording into lanes. Open the Tracks menu beside the layers icon at the left end of the timeline toolbar to show or hide lanes. Hiding a lane in this menu does not remove its content from the preview or export.
- Camera Cue holds camera layout changes for sections of the timeline and requires a recorded camera feed. In 9:16, Bubble and Split cues do not apply; Camera Only and Screen Only remain available.
- Video holds your recording as one or more clip pills, with the audio waveform drawn across them.
- Auto Zoom holds zoom and pan keyframes.
- Subtitle holds time-based subtitles.
- Keystroke appears when it has keystrokes.
- Mask and Sound Effects hold their own time-based overlays when they have content.
- Audio starts hidden, because the Video lane already shows the waveform. It shows on its own when a recording has system audio, and you can show or hide it from the Tracks menu.
Use the plus and minus controls, the zoom slider, or a trackpad pinch to change the timeline scale. The zoom stays anchored around the point you are viewing so you can inspect a precise moment without losing your place.
Trim and cut
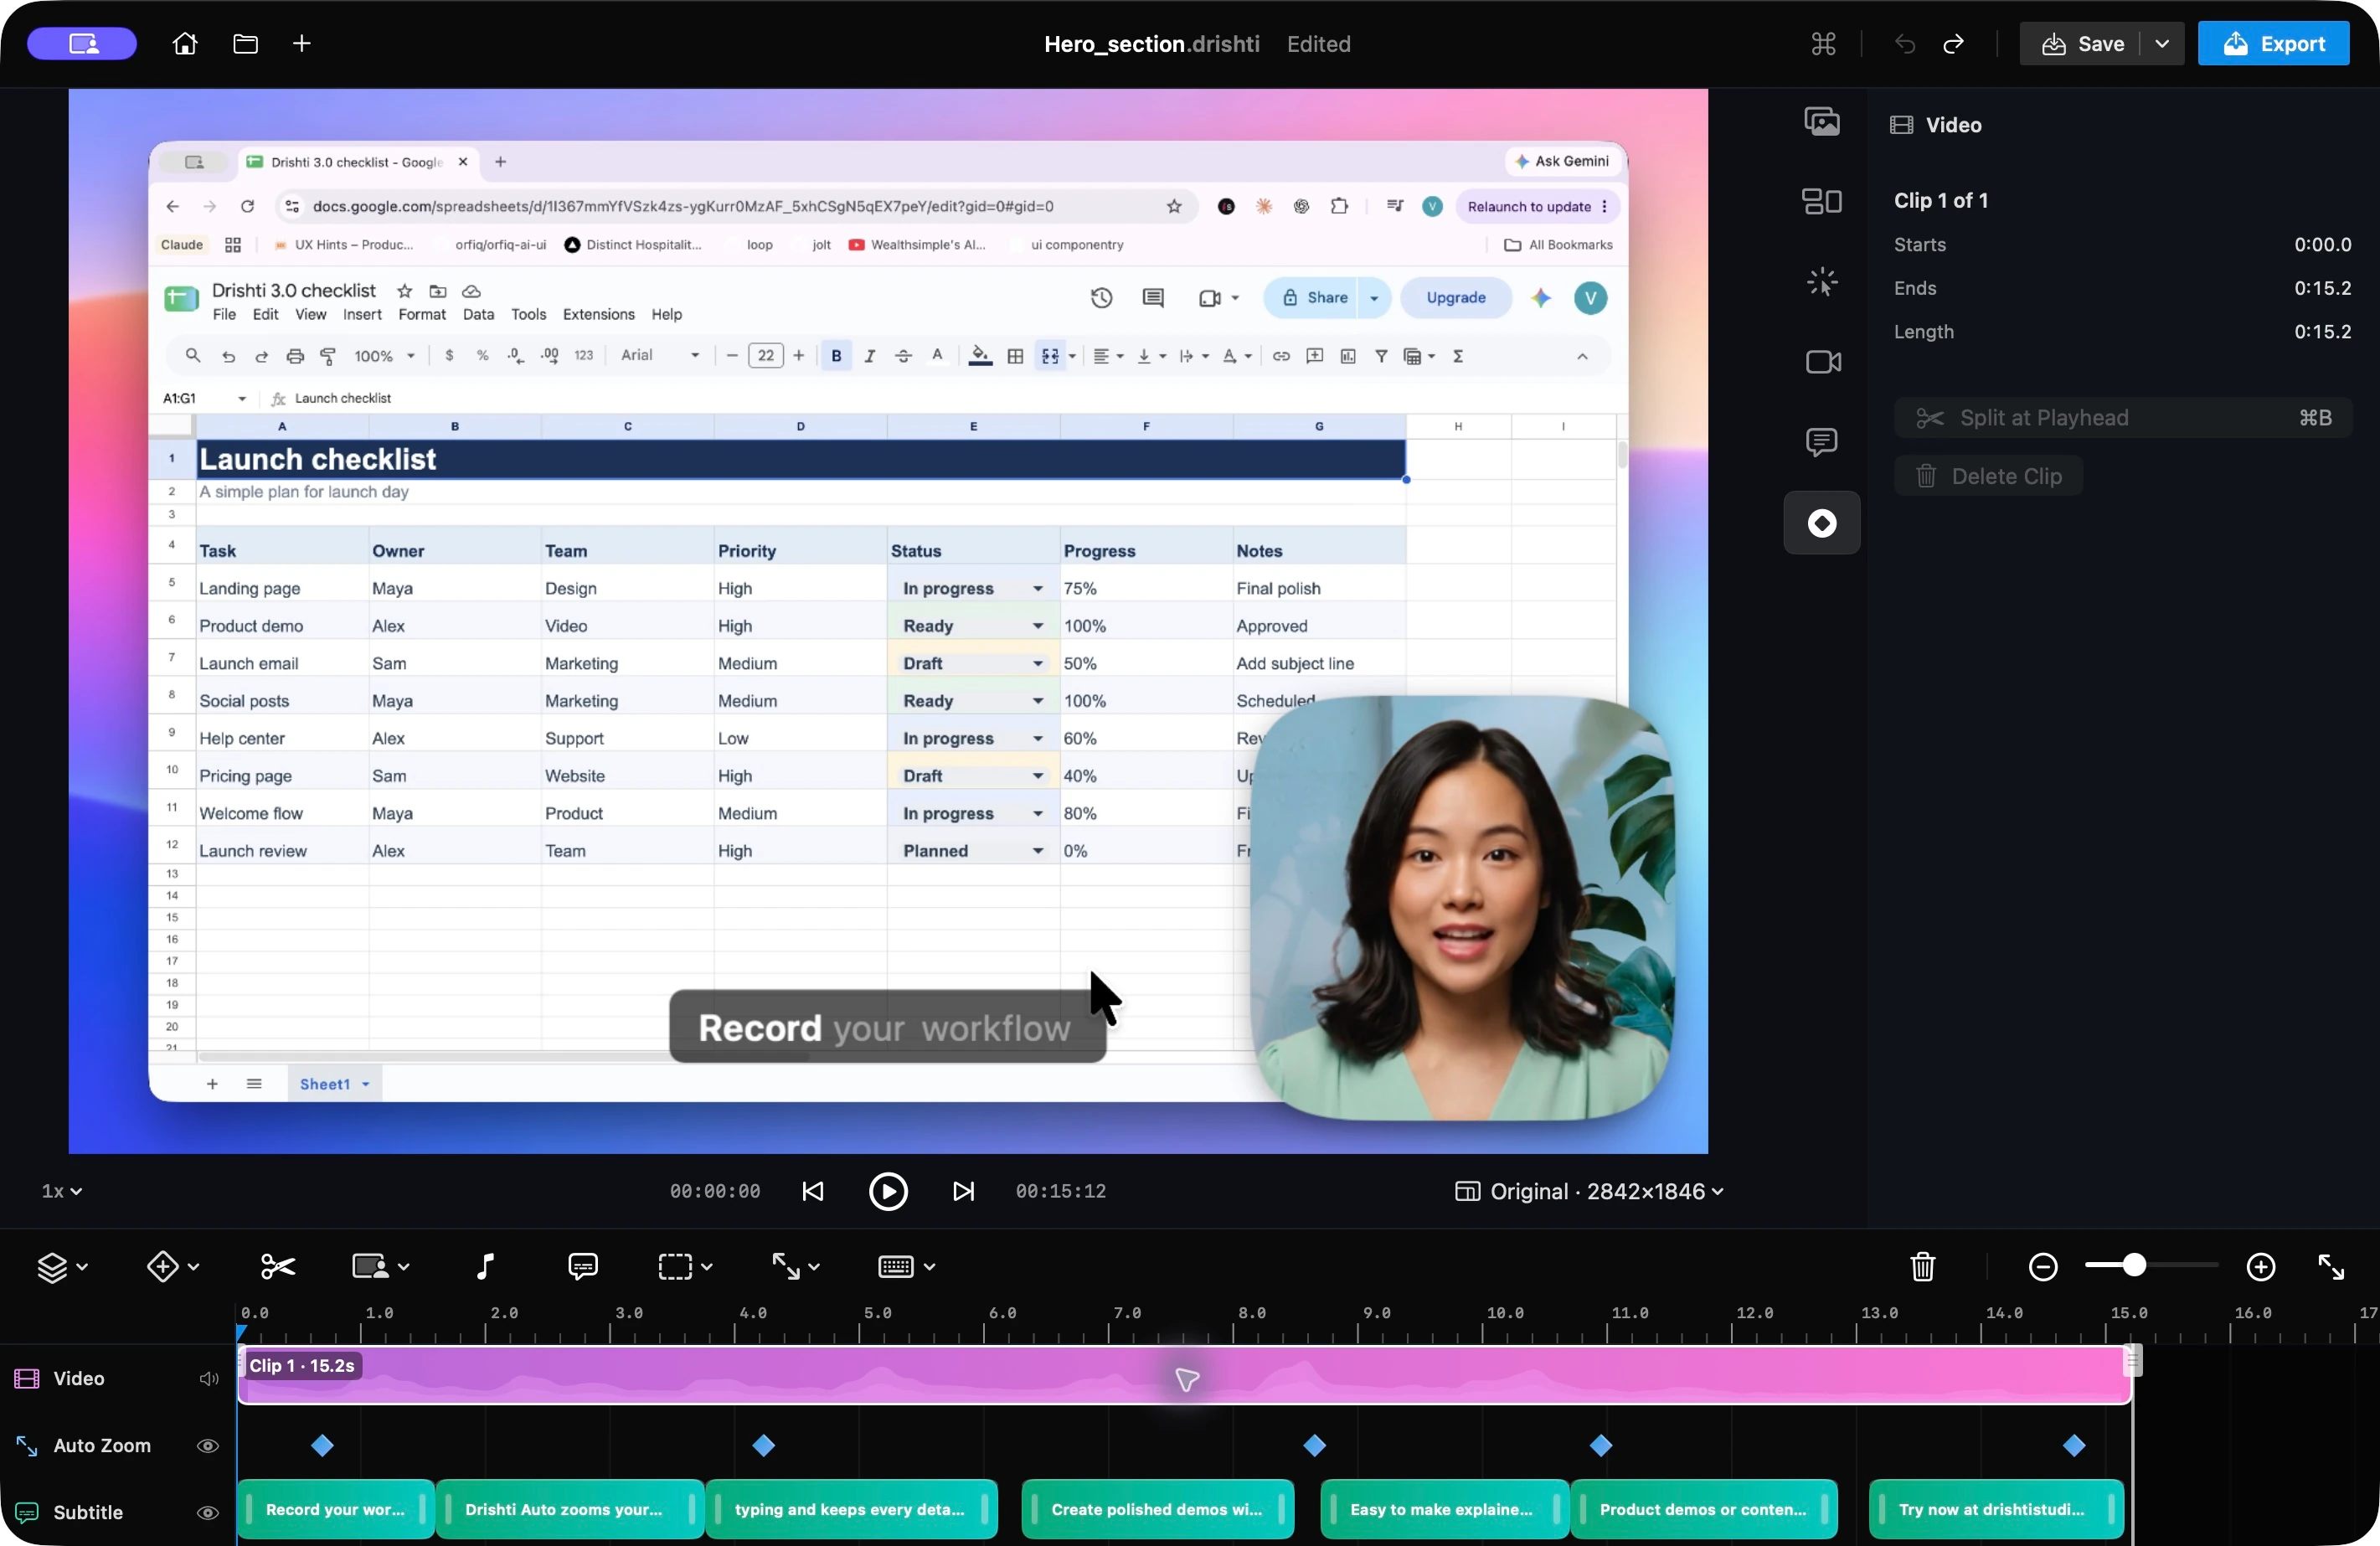
The Video inspector shows the selected clip number, start time, end time, and length. Split at Playhead and Delete Clip appear below the timing fields. A control is dimmed when it is unavailable for the current selection or playhead position.
- 1
Trim the ends
Drag the trim handles to remove setup time at the start or unused time at the end of the recording.
- 2
Turn on Cut mode
Press C, or choose the scissors button in the timeline toolbar. The pointer turns into scissors, and a red line shows exactly where the cut will land.
- 3
Click on both sides of the part to remove
Each click cuts the video at that point. After the second click, the piece between your two cuts is selected.
- 4
Press Delete
The piece is removed and the gap closes. Press C or Escape when you are done cutting.
You can also cut without Cut mode. Move the playhead to the spot and press ⌘B to split the clip there, then select a clip and press Delete, or choose Delete Clip in the inspector. Splitting on its own never changes the video. Nothing is removed until you delete a clip.
To move a cut, drag the edge between two clips. When you delete a clip, everything after it moves up on every lane, so subtitles, zooms, and sound effects stay with the footage they belong to. The clips on either side stay separate, so you can still keep or delete each one.
Bring back a removed part
Use Undo, or right-click the clip next to the gap and choose Restore Removed Part. When you select a clip, the inspector tells you if a removed part sits before, after, or inside it.
Times in the lanes, the inspector, and under the preview follow the ruler with removed parts left out, so they always match the video you will export.
Cut around a subtitle
To drop a sentence you did not mean to say, right-click its subtitle pill and choose Cut Video Around Subtitle. The same button is in the inspector. That part of the video becomes its own clip, already selected, so pressing Delete removes it. In the Subtitles window, hover a line and choose Cut to mark it. It becomes its own clip when you apply your changes.
Edit in passes
First remove mistakes and dead time. Then review framing, camera cues, subtitles, and audio. This keeps each pass easy to judge.
Adjust audio and undo changes
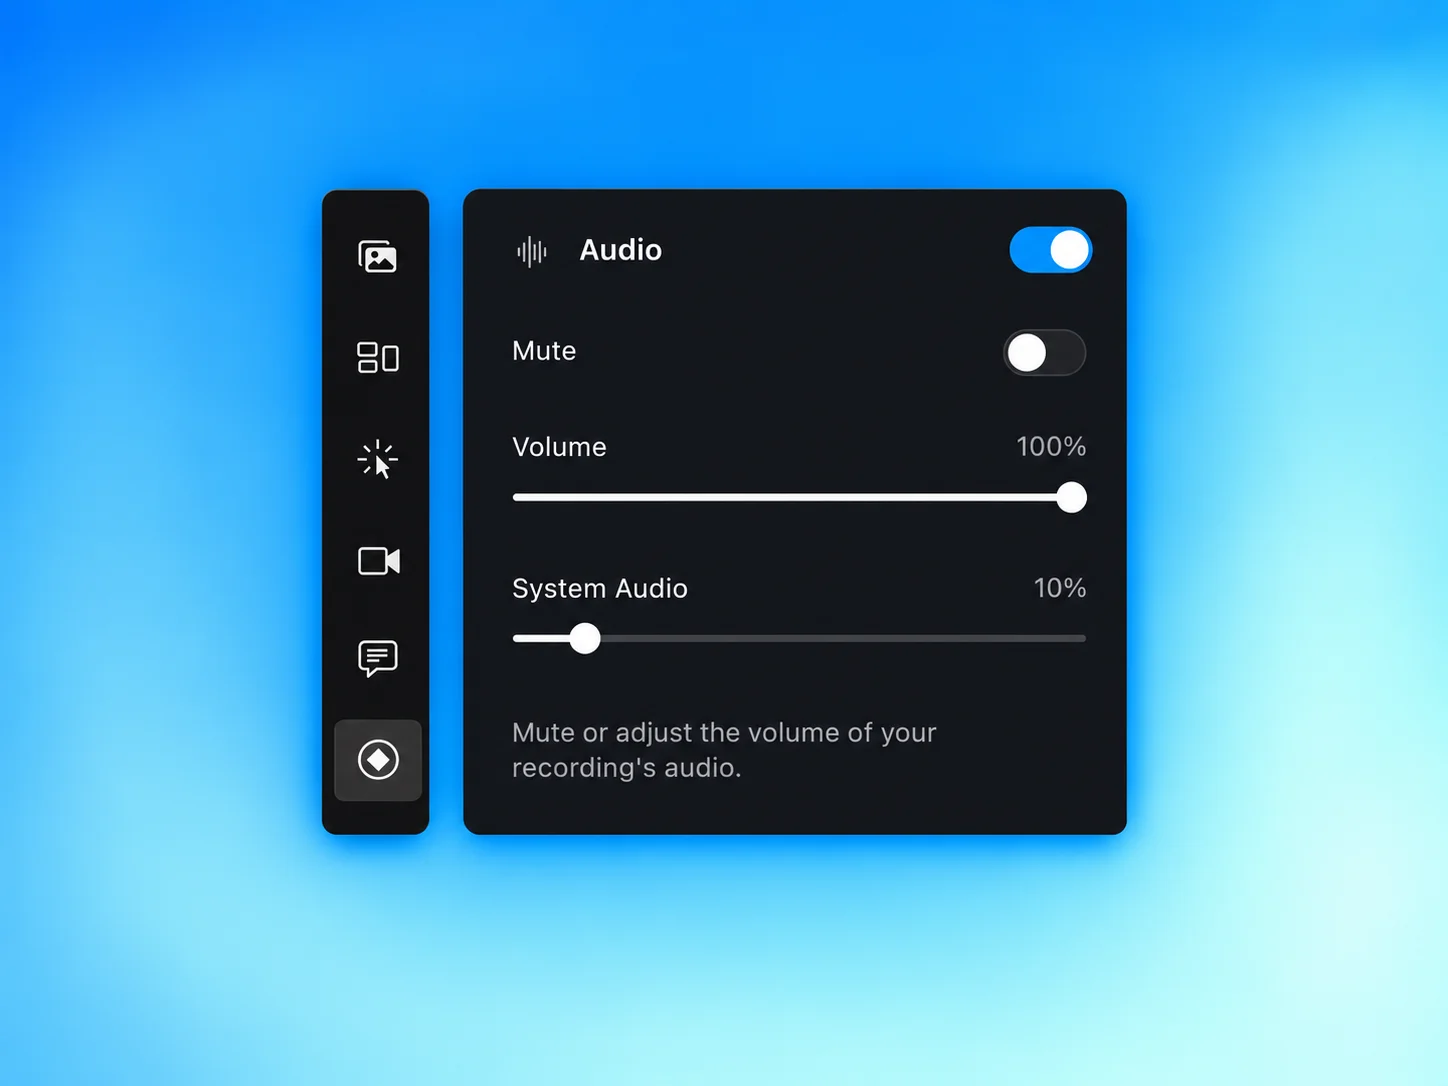
Choose the speaker button on the Video lane to mute or unmute the recording audio. To change its volume, select a clip on the Video lane or select the Audio lane, then use the Audio controls in the inspector.
When you record with both Microphone and System Audio on, a System Audio slider appears under Volume. Your voice and your Mac's sound are saved as separate tracks, so this slider changes only the Mac sound, such as app sounds or a video you play. It starts at 40%, which keeps that sound under your voice. Volume still changes both together.
Use Undo and Redo as you work. They apply to supported editor changes, including cuts and other timeline edits.
Keyboard shortcuts
Press ⌘? or choose the keyboard shortcuts button to open the help popup. The list follows where you are in the app: recording actions appear during setup, and timeline actions appear in the editor. The overview below combines the available categories for reference.
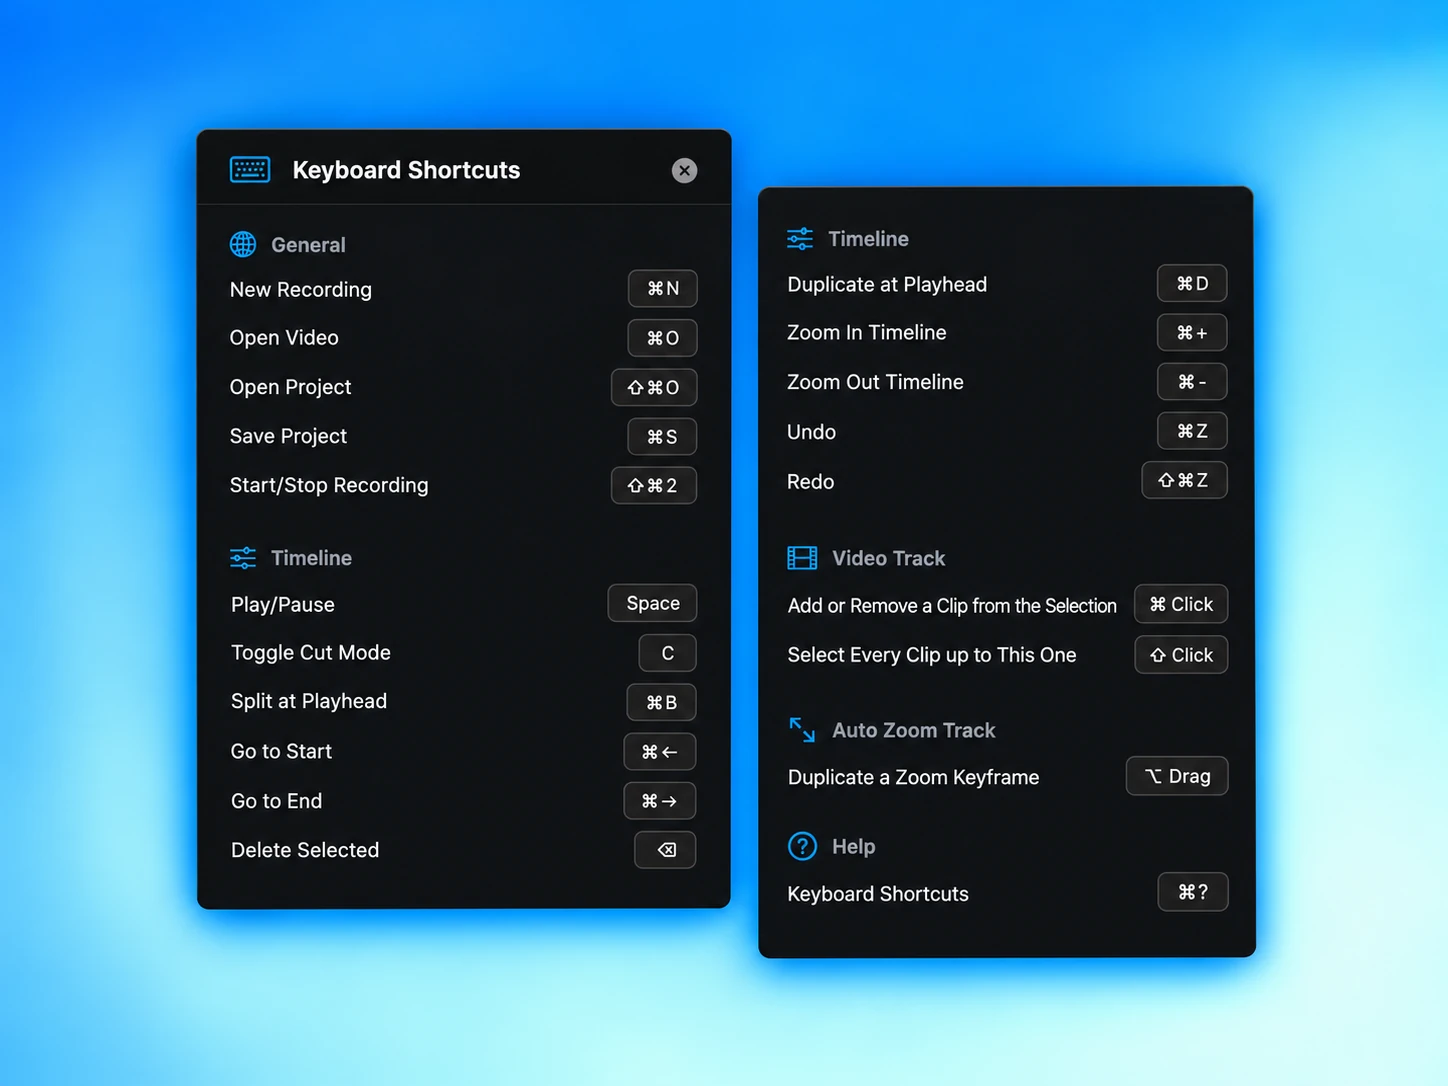
- Open New Recording.⌘N
- Open a video file.⌘O
- Open a Drishti project.⇧⌘O
- Save the current project.⌘S
- Play or pause.Space
- Turn Cut mode on or off.C
- Split the clip at the playhead.⌘B
- Duplicate the selected item at the playhead.⌘D
- Add or remove a video clip from the selection.⌘ Click
- Select every video clip up to the one clicked.⇧ Click
- Duplicate a zoom keyframe on the Auto Zoom track.⌥ Drag
- Delete the selected clip or keyframe.⌫
- Go to the start.⌘←
- Go to the end.⌘→
- Undo.⌘Z
- Redo.⇧⌘Z
- Zoom in on the timeline.⌘+
- Zoom out on the timeline.⌘-
- Start or stop recording.⇧⌘2
- Show all keyboard shortcuts.⌘?
Last updated: November 21, 2026